GitLab workflow for CMS-AN
Table of Contents
- Summary of Workflow
- Detailed workflow
- Commands Summary
- Some known issues & their fixes
- Gitlab AN/Paper clone steps
A gitlab workflow for analysis is given in this blog. This is a general git workflow, summarised in terms of CMS-AN.
Summary of Workflow
- Fork the repository under your gitlab account.
- Clone the repository using your username and setup as per the instruction given in Section-Gitlab AN setup
- Checkout new branch (
git checkout -b <BranchName>) and start working. You can commit frequently and save changes. -
When you are ready with all your changes and think it should be merged in the central repository. Then do the following:
-
First update your local from
masterbranch of our central repository. -
Then commit your changs and make the merge request to our central repository.
-
- Done.
Detailed workflow
-
Fork the repository from the central repository: https://gitlab.cern.ch/tdr/notes/AN-20-165
-
Click on
Fork, as shown in image below: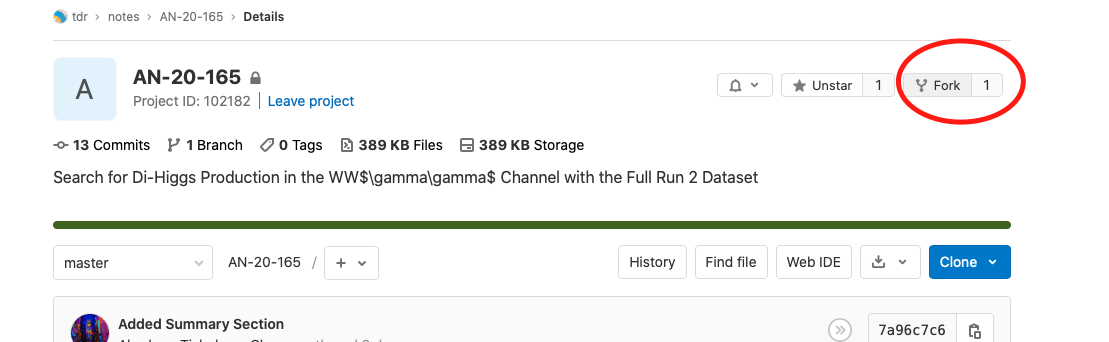
-
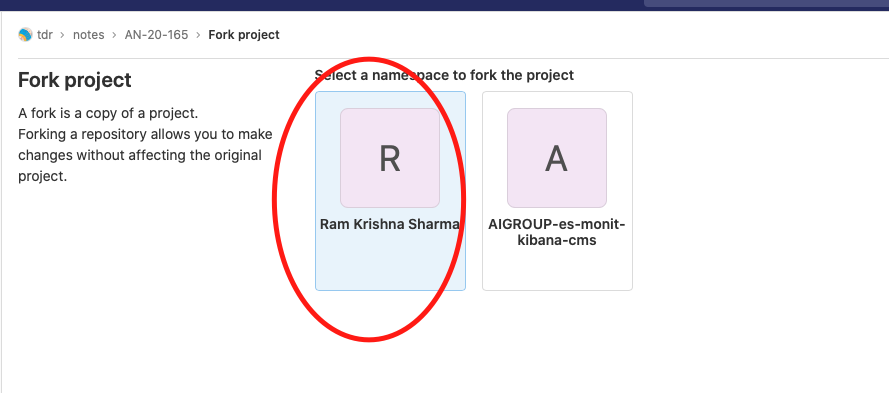
If you are attached with another organization then it may show you page as shown below then click on your name:
-
-
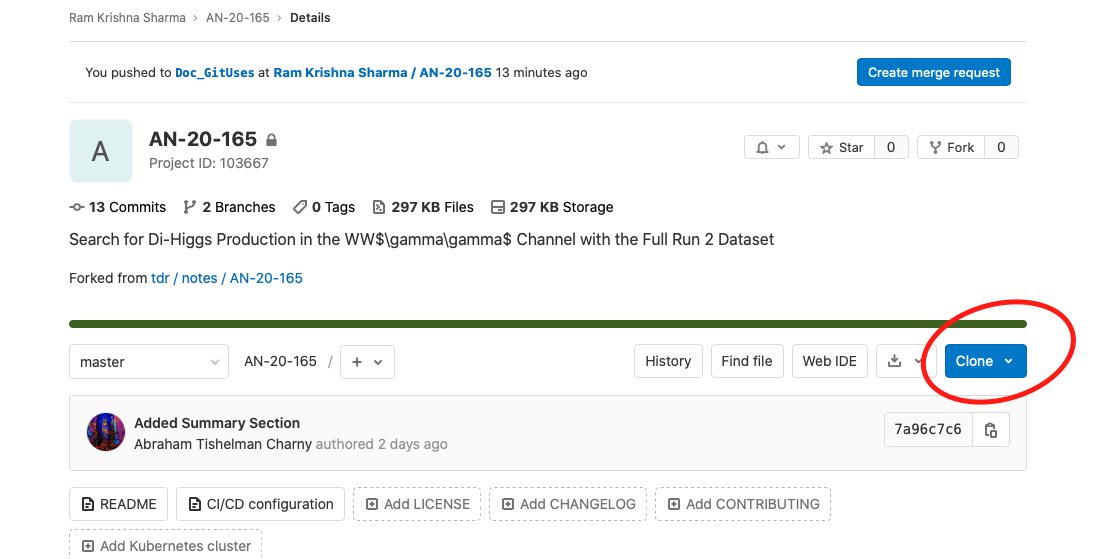
Now, one can see the repository into your gitlab account:
https://gitlab.cern.ch/users/<LXPLUS-USER-NAME>/projects. Then click on the project named AN-20-165. -
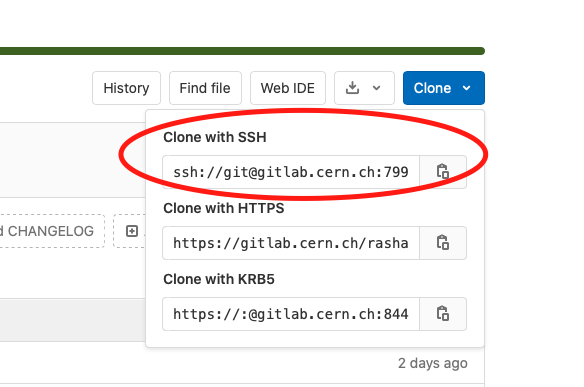
Then copy the SSH link (we need this in step-5(c)).
a.
b.
-
Clone the repository using the central repository:
git clone --recursive ssh://git@gitlab.cern.ch:7999/tdr/notes/AN-20-165.git -
Next, we need to add remote which will point to our personal repository.
a) What is “remote” in the above command?
When we collaborate on a git project, where many people are working then we might need to get updates from other people repository. So, we need to know the address (or the pointer of the address) to the other repository. The pointer of the repository address is known as remote. Now, there are couple of things that we should know.
b) How to check the remotes?
If you already cloned the repository (say https://gitlab.cern.ch/tdr/notes/AN-20-165) then you can check the remote name using:
cd AN-20-165
git remote -v
Its output should be like this:
[rasharma@lxplus734 AN-20-165]$ git remote -v
 origin  ssh://git@gitlab.cern.ch:7999/tdr/notes/AN-20-165.git (fetch)
 origin  ssh://git@gitlab.cern.ch:7999/tdr/notes/AN-20-165.git (push)
Here, the name of your remote is “origin”. If you clone from your personal repository, (say ssh://git@gitlab.cern.ch:7999/rasharma/AN-20-165.git), then the origin will point to your repository (Added this line for information but don’t clone from personal repository, else you won’t get the utils directory by default. It is because of some permission issue.).
[rasharma@lxplus734 AN-20-165]$ git remote -v
 origin  ssh://git@gitlab.cern.ch:7999/rasharma/AN-20-165.git (fetch)
 origin  ssh://git@gitlab.cern.ch:7999/rasharma/AN-20-165.git (push)
c) How to add new remotes? If you cloned from the central repository, then you should add your repository remote. To add your remote:
cd AN-20-165
git remote add <ChooseAnyName> ssh://git@gitlab.cern.ch:7999/tdr/notes/AN-20-165.git
I am choosing name “myRepo”.
cd AN-20-165
git remote add myRepo ssh://git@gitlab.cern.ch:7999/rasharma/AN-20-165.git
Just to confirm if the remote is added or not, please check again the remote usign the command:
cd AN-20-165
git remote -v
Its output should be like this:
[rasharma@lxplus734 AN-20-165]$ git remote -v
 myRepo  ssh://git@gitlab.cern.ch:7999/rasharma/AN-20-165.git (fetch)
 myRepo  ssh://git@gitlab.cern.ch:7999/rasharma/AN-20-165.git (push)
 origin  ssh://git@gitlab.cern.ch:7999/tdr/notes/AN-20-165.git (fetch)
 origin  ssh://git@gitlab.cern.ch:7999/tdr/notes/AN-20-165.git (push)
Now you can see that there are two names myRepo and origin. Both of them are attached to the ssh link. One belongs to my github username and another belongs to our central repository.
Once you added your remote you should always use your repository remote name for adding your commits.
NOTE: You should keep both remotes with you (central and yours). Your repository remote for committing your changes and central repository remote to update your local branch with the latest updates added by other people.
-
Branch Creating:
cd AN-20-165
git checkout -b <NewBranchName>
For example I created a branch named Doc_GitUses:
git checkout -b Doc_GitUses -
Check if the branch created using command:
git branchOutput should look like:
[username@lxplus734 AN-20-165]$ git branch
 * Doc_GitUses
 master
Here, “*” shows that the current banch on which you are is Doc_GitUses.
- If you want to change the branch to master then do
git checkout masterOne should not work on master branch so don’t edit here. Go back to the branch you created using
git checkout NewBranchName, then edit on NewBranchName. -
You can commit and push as many times as you want. When you think you are done then you should try to see if anyone else already update anything in master or not. For this you should try to pull the updates from master.
git pull <remote-name> masterNOTE: Our main repository remote name is “origin”. So, the command that we should use is
git pull origin master - When you run the command:
git pull origin masterthen it will pull the latest changes from master to your local (into your current branch).
-
Here you might get the merge conflict. This comes when two people are editing the same file. Then git is unable to decide what to choose.
-
Now, we should open the file having conflicts then resolve it.
-
If you don’t know about it please look at this link: Resolving a merge conflict using the command line
-
If you have still an issue then please let me know.
- If the
git pullworks without any error or warning then commit and push your changes:
git commit
Then this will open the editor, where you can write a summary message of your commit then close the file.
git push <remote-name> <NewBranchName>
In the previous steps, I took personal repository remote name as myRepo and NewBranchName as Doc_GitUses. So, one should use the command:
git push myRepo Doc_GitUses
- If you think you are ready for making merge request. Then before making merge request always update your local branch from master branch of the central repository. If the central repository given by origin :
[rasharma@lxplus734 AN-20-165]$ git remote -v
   myRepo  ssh://git@gitlab.cern.ch:7999/rasharma/AN-20-165.git (fetch)
   myRepo  ssh://git@gitlab.cern.ch:7999/rasharma/AN-20-165.git (push)
   origin  ssh://git@gitlab.cern.ch:7999/tdr/notes/AN-20-165.git (fetch)
   origin  ssh://git@gitlab.cern.ch:7999/tdr/notes/AN-20-165.git (push)
Then, you should update your local branch using command:
git pull <remote-name> master
In the example, that we showed above our central remote name is origin so we should run the command: Then, you should update your local branch using command:
git pull origin master
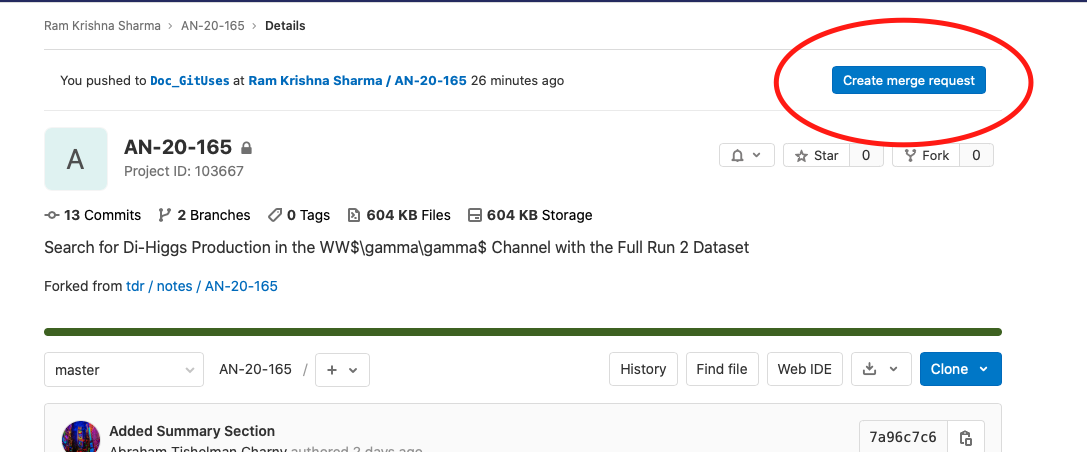
- Finally, make the merge request from the gitlab webpage as shown below:
- Step-1:
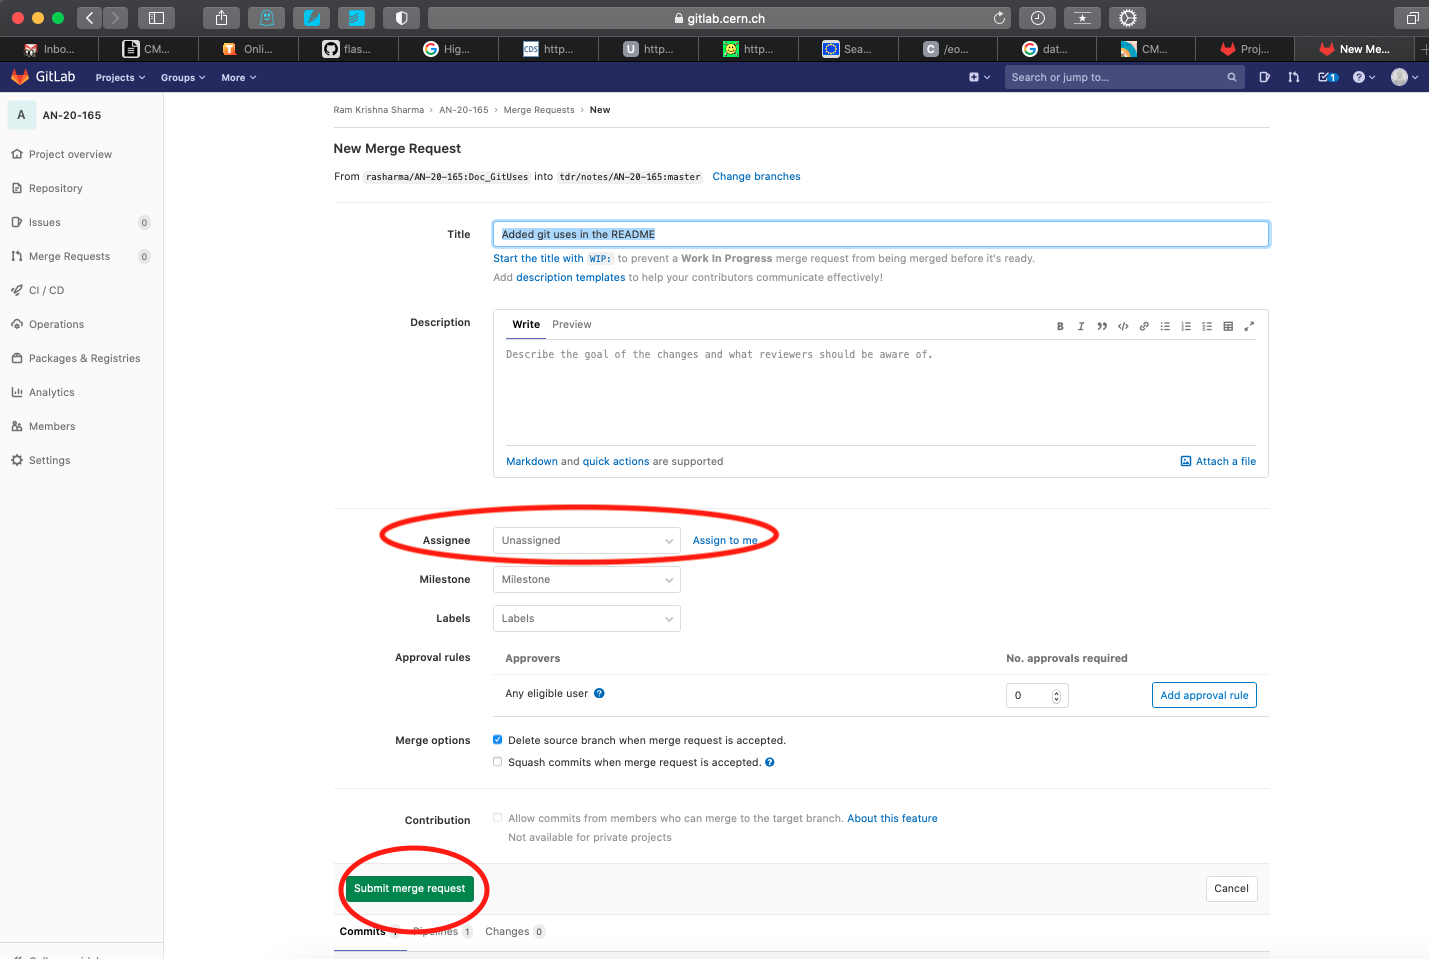
-
Step-2: Here, remember to fill out “Assignee” as @atishelm
Commands Summary
git clone --recursive ssh://git@gitlab.cern.ch:7999/tdr/notes/AN-20-165.git  # if you are working on lxplus you should use ssh link
cd AN-20-165
git remote add myRepo ssh://git@gitlab.cern.ch:7999/<YourUserName>/AN-20-165.git
# Next step create a branch name with the doc \you want to add (say you want to update systematics)
git checkout -b Doc_Systematics
# Edit files
git add a.tex b.tex # add all the files that you modified
git commit # this opens up the editor add your update summary and close this  file.
git pull origin master # Grab the latest updates from master branch
# you might see some conflict if you and some other people edited the same branch. If yes, then you need to remove conflict and then commit.
git push myRepo Doc_Systematics  # Here myRepo and Doc_Systematics are the names that you assigned above.
# Go to wepage of your github repo and make pull request.
Some known issues & their fixes
-
Always try to clone from central repository only. i.e.
ssh://git@gitlab.cern.ch:7999/tdr/notes/AN-20-165.git. There is a known issue of the permission of cloing the utils as submodule. If we clone from central repository then it automatically clones the utils repository. This does not work when we try to clone from our personal (forked) repository. -
If your ssh key is not properly saved in the gitlab then you may get following error:
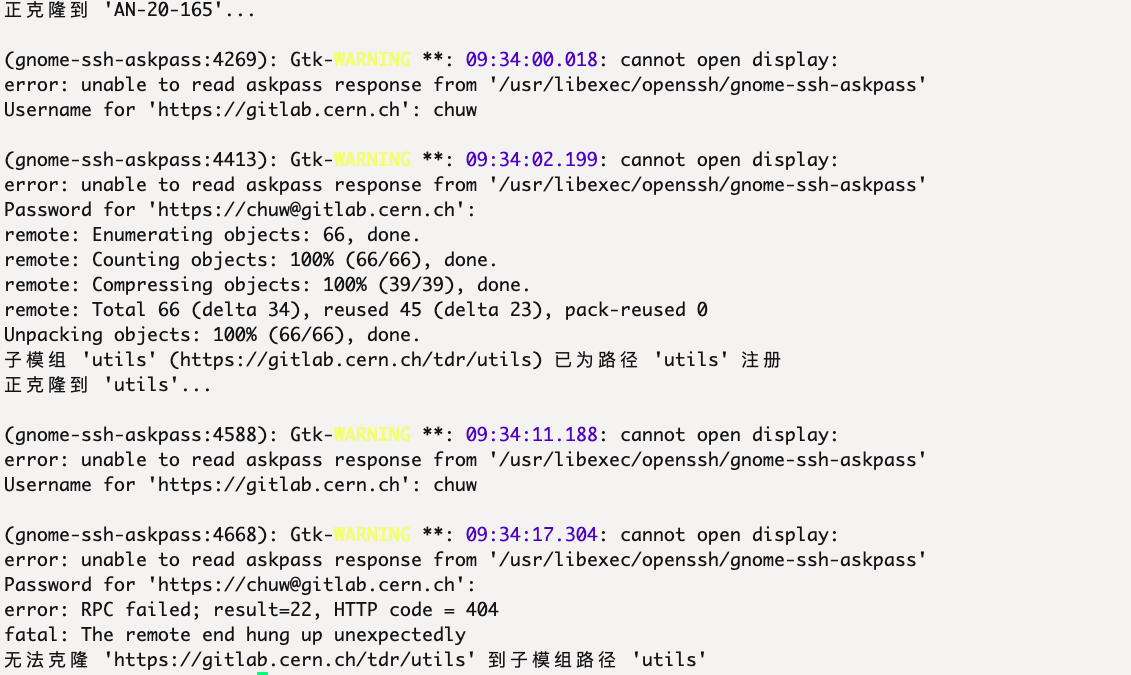
Generally, all of us work with both github and gitlab. So, we should keep the ssh key same at both places. The above error appears when the key is not matched at lxplus and at gitlab. To fix this issue try to copy the content of file
.ssh/id_rsa.pubfrom your lxplus. Then add it in your gitlab account settings and save it. Then it should work.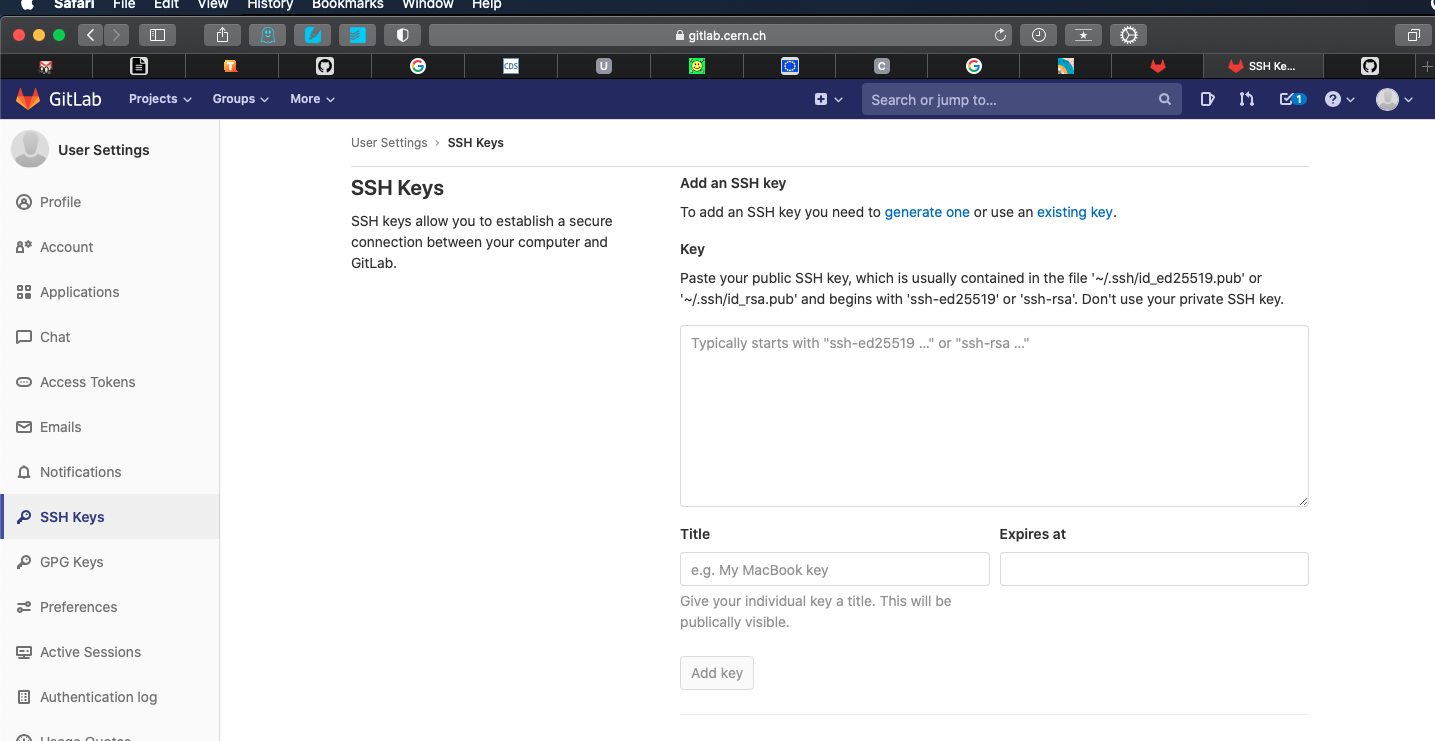
Gitlab AN/Paper clone steps
Setup Commands
To clone on lxplus, first move to your desired working area on lxplus and clone the respository:
Via HTTPS:
git clone --recursive https://gitlab.cern.ch/tdr/notes/AN-20-165.git
Via SSH:
git clone --recursive ssh://git@gitlab.cern.ch:7999/tdr/notes/AN-20-165.git
Note: If you clone via SSH, you will need to set your git user email address in order for your GitLab profile picture to show up on the GitLab.com remote repository next to your commits. This is recommended as it will make it easier to identify who makes commits. This is done in your cloned repository with the command:
git config --local user.email "username@cern.ch"
where “username@cern.ch” should be your CERN e-mail address, as this should be associated with your GitLab account.
Via KRB5:
git clone --recursive https://:@gitlab.cern.ch:8443/tdr/notes/AN-20-165.git
Note the –recursive option, necessary for the linked “utils” commit to be cloned for the tdr executable.
After cloning you should change to the cloned repository directory:
cd AN-20-165
Then run one of the following commands, depending on your shell. I used -sh for bash (Bourne-Again shell) on lxplus by default. This command needs to be run every time you start a new lxplus session:
eval `utils/tdr runtime -sh` # bash
eval `utils/tdr runtime -csh` # csh
eval `utils/tdr runtime -fish` # fish
To produce the PDF, run the tdr executable:
tdr --style=note b # the local document with the name of the directory is the default build target
if this works properly, at the end of the output you should see:
PDF Output file: /tmp/<lxplusUsername>/tdr_bld_<randomHash>/AN-20-165_temp.pdf
this is the location of the LaTeX generater PDF of the analysis note. The output should also notify you of any LaTeX compilation errors.
Other Commands
In case the utils submodule is removed from the repository, it can be added back locally and committed with the commands:
git submodule add -b master ../../utils
git add utils
git commit -m "Adding the latest utils submodule"
it can also be updated to the latest available version via the commands:
git submodule update --remote
git add utils
git commit -m "Updating to the latest utils commit"
Enjoy Reading This Article?
Here are some more articles you might like to read next: